CR-10S
After seeing glowing reviews online for the Creality 3D printer CR-10S. I decided to take the leap and purchase one.
I currently have the reliable, but trustworthy Qidi Tech X-One. It has treated me very well, but it lacks the build space that I would like to have for the larger prints that would require extra slicing into smaller parts. The Qidi Tech X-One printer bed is 150x150x145ish and is actually pretty standard. The CR-10S printer bed is 300x300x400.
Yes there is an argument for the benefit of a smaller print bed size because even though it forces multiple smaller prints to then later assemble into a larger single object, the is a benefit of producing producing
Setup
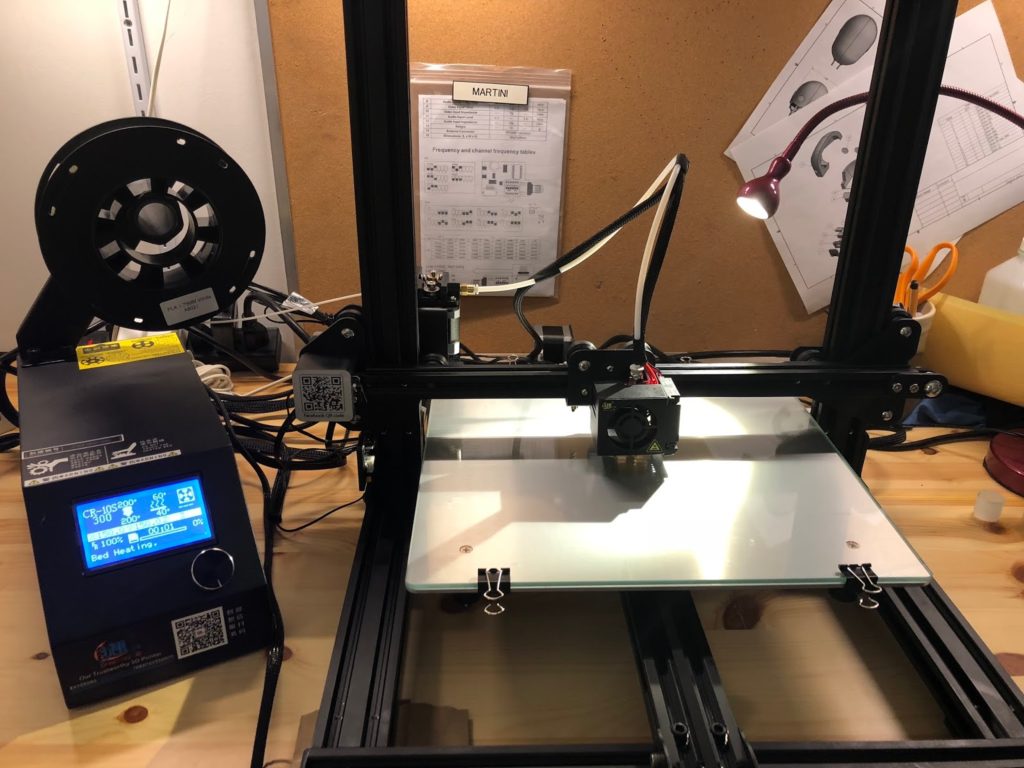
Assembling the Creality 3D printer CR-10S was not too involved, but thanks to some generous YouTubers like SAN TUBE’s Creality CR-10S Assembly, the process went much smoother. The provided instructions were not bad for frame assembly, but there was almost no instructions on how to connect the wiring from the power box to the printer itself. Yes, they are labeled with X,Y and Z to note the particular servos to attach them to, but Id prefer not to have to worry about that during assembly with all the other tasks at hand. Many videos mention going through the entire setup and ensuring the frame, motors, printer bed and belts are nice and snug. Adjusting these items are easy enough, but knowing where to look can be tricky. Again, the video I used took time to go over where to look. One thing I am not a fan of is the power box dial for selecting menu items. It feels cheap and at times is over sensitive. When I scroll to select a menu item and press down on the wheel to select, it can easily move up or down during the press. This leads me to selecting options and settings by mistake. Its easy enough to get back to where you want to go, but it happens more than Id like. I’m going to go out on a limb and say that there is a difference between the CR-10 and CR-10S in terms of build quality. It seems the CR-10 has more issues with loose parts than the CR-10S, but then again maybe I was just lucky. One would hope the ‘S’ iteration of the printer provided a version with simple things addressed like loose pre-assembly. I digress.

Start your Engines
Firing up the printer for the first time provided no surprises other than that it seems to work well after conducting manual axis move testing. X, Y and Z axis all moved along with no grinding or screeching noises. The print bed leveling experience proved to be the hardest part. The Qidi X-One printer bed calibration is done in a triangular 3-point pattern. Two points are checked in the front left and right and one in the middle-back. This is due to its smaller size. The CR-10S on the other hand has a much larger print bed and had all four corners dialed in as well as a center bed check. Its not easy to calibrate and takes a lot of trial and error. The ‘auto bed’ leveling that is advertised with this printer only applies to the fact that the printer head automatically assumes each point on the printer bed for you to check the level with. Its is NOT a one-click and ‘bam’ the printer is calibrated. Its hard to tell if you have this printer bed level without attempting a print. So pick something simple and only a few layers high to ensure the center of the print bed is far enough away from the bed not to squish the filament, but close enough for the filament to be ‘pressed’ onto the bed for adhesion.
Speaking of filament, ensure you push the filament all the way into the extruder and push out the test filament from the factory test. I made the mistake of feeding the filament to the extruder, but did not push the filament through. I tried to start a print and nothing came out of the nozzle except black PLA. The filament I was using was a white translucent PLA. I then ensured the nozzle temp was up to at least 200 degrees and forced the filament through slowly until the black color was replaced with the new white one. Just be aware that you need to run the existing PLA out of the nozzle first.

The first print
I used the default cat.gcode that come on the CR-10S SD card to run my first prints. I didn’t bother running it into Cura to prep the print because I wanted to see how the ‘out-of-box’ printer capabilities were. I laid down a thick layer of glue onto the glass sheet covering the printer. The print did not stick immediately. A few things went wrong with the printing right off the bat.
#1. Z height on the printer bed was too low. Although it felt level on the 4 corners, the center of the bed was actually lower and since that is where the prints were starting from, it never stuck to the bed. I flipped the glass sheet over and recalibrated. That seemed to help.
#2. The glue on its own wasn’t cutting it. The 1st layer would not stick to the heated print bed because the glue would dry before the printing even started. I then used the proved masking tape like material to cover the bed WITH the glue. This seemed to provide a better opportunity for the glue to not dry as well as the texture helped the melted first layer PLA catch the surface. I will say that there are many other printer bed combos that could be utilized to solve this problem, such as lowering the heated printer bed temp from 60 to 50 degrees with glass only or build up a decent raft around the first layer hoping it will be enough to stick in its entirety.
The other issue with my first print was that the filament would not start extruding until a few seconds into the print. It would just swing around looking like it was printing and then eventually it would start coming out. By then it was already past the skirting phase and working on the object itself. This led to quite a few bound up PLA messes and aborted starts. At one point the print moved off the bed completely and morphed into curly fries.
This issue was solved by both correcting the Z height of the print bed in calibration as well as using a bigger raft around the print to ensure the filament was extruded enough by the time it got to the printing the object in question.
In summary, after the glass sheet covering the bed was flipped, tape AND glue applied, heated bed temp lowered and center bed contact dialed in I was off and printing my cat.gcode.
Results
Once the issues above were addressed, the printer hummed along. The printer itself was even quieter than the Qidi Tech X-One. The cat.gcode print came out amazingly well using the provided PLA. Print time was 3 hrs 30 mins, decent amount of time for small object but worth the wait due to its detail. Then moved onto a 50% scaled down version of the Classic Model Rocketfrom on Thingiverse.com by BotMaster. This printed very well with much less zitting than the same prints on the Qidi Tech X-One. The Qidi Tech would print the point on the rocket cone and it would melt into a ice-cream cone style twist at the top. This was most likely due to nozzle temp to high. In contrast, the CR-10S rocket cone came out clean and sharp, even for such a small scale. The biggest issue I saw on the CR-10S small rocket print was a big of a lip on on side of the rocket. It is consistent down the whole side and only occurs briefly which leads me to believe it may be retraction setting related. There are a TON of other setting to mess with to perfect this, but aside from a bit of a bumpy start (some self inflicted) I am very impressed with these limited prints and look forward to seeing what it can really do.
This printer isnt as ‘out-of-the-box’ as some other printers like the Qidi Tech X-One, but with a bit of tweaking and TLC, the prints it can produce exceed anything I did with the Qidi so far.